

The problem#
I use one PC for two very different kinds of work. During the day it’s my work machine, with company repos, a company Claude account and the company’s usage plan. In the evenings and at weekends it’s where Gremlin, the games on this site and this blog get made, on my own personal Claude account.
Out of the box, Claude Code doesn’t know that distinction exists. Every claude session on the machine reads and writes the same configuration directory, so there’s one login, one set of settings, one history and one set of memory. Whoever logged in most recently wins.
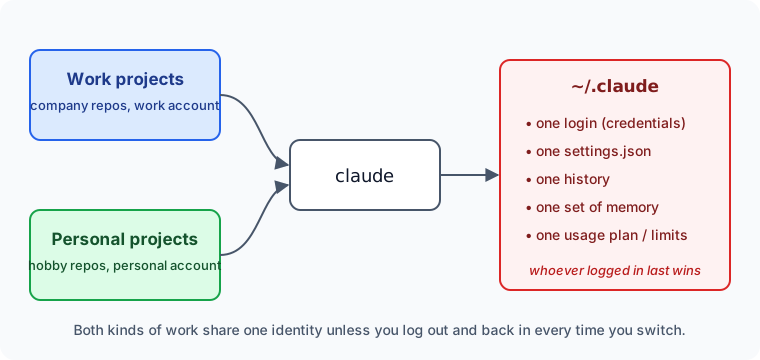
That causes some real problems:
- The wrong account gets used. Forget to switch and your hobby project runs on the work plan, or work code goes through a personal account. Neither is great, and the second could break your employer’s policies.
- Switching is slow. Logging out and back in each time breaks your flow, and you can’t run both at once.
- Settings and memory get mixed. I want different defaults for each (different models, different permission modes). Claude’s memory of my personal projects has no business turning up in a work session, and the reverse is true too.
What I want is two commands, claude-work and claude-personal, that always run as the right account, can run side by side, and keep everything apart. I also want both as one-click options in VS Code’s terminal menu.
This guide covers Linux and WSL (Windows Subsystem for Linux), which is where I run Claude Code. The VS Code part assumes VS Code on Windows with WSL terminals, and there’s a note for anyone using the Remote-WSL extension instead.
How it works#
The whole solution depends on one environment variable: CLAUDE_CONFIG_DIR.
When Claude Code starts, it checks that variable to decide where its state lives. If it isn’t set, Claude uses the default ~/.claude/ directory and a ~/.claude.json file in your home folder. If it is set, everything goes into the directory you named instead: the login credentials, .claude.json, settings.json, history and per-project memory.
So “two accounts” really means “two config directories”. You run the same claude program with a different value of CLAUDE_CONFIG_DIR each time, and it behaves like two separate installs.
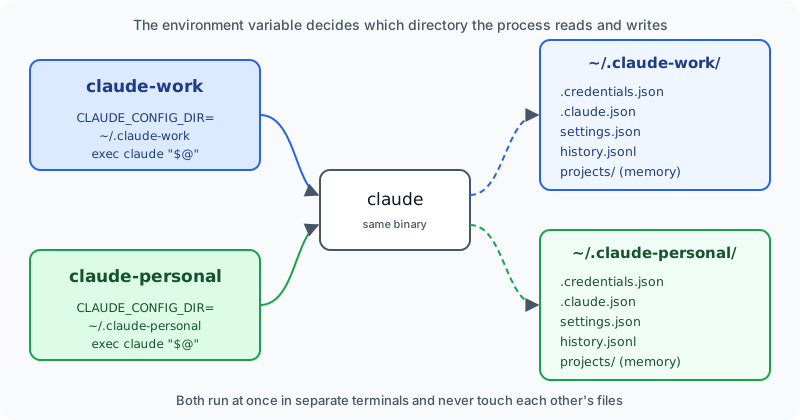
The rest of this guide just makes that easy and reliable to use.
Step 1: Create the wrapper commands#
Create two small shell scripts in ~/.local/bin, which is the usual place on Linux for commands that belong to you rather than to the system:
mkdir -p ~/.local/bin~/.local/bin/claude-work:
#!/bin/sh
# Launch Claude Code with the 'work' account's config directory.
# A real command (not a bash alias) so it works from any shell, script,
# or the VS Code terminal.
CLAUDE_CONFIG_DIR="$HOME/.claude-work" exec "$HOME/.local/bin/claude" "$@"~/.local/bin/claude-personal:
#!/bin/sh
# Launch Claude Code with the 'personal' account's config directory.
CLAUDE_CONFIG_DIR="$HOME/.claude-personal" exec "$HOME/.local/bin/claude" "$@"
Then make them executable:
chmod +x ~/.local/bin/claude-work ~/.local/bin/claude-personalEach script is only one line, but every part of that line does a job:
#!/bin/shis the shebang. When you run a file directly, the kernel reads this first line to find out which interpreter should run it. I’ve used plainshrather thanbashbecause the script needs no bash features, andshstarts up slightly faster.CLAUDE_CONFIG_DIR="…" commandputs the variable assignment on the same line as the command. That sets the variable only for that one command. Nothing gets exported into your shell, so a plainclaudetyped afterwards is unaffected.execreplaces the shell script’s process withclaudeinstead of startingclaudeas a child and waiting for it. No idleshprocess sits in between, soclaudereceives keyboard signals (like Ctrl+C) directly, and its exit code becomes the command’s exit code."$HOME/.local/bin/claude"is the full path to the real binary. The native installer puts it here (as a symlink to the current version). Using the full path means the wrapper can never accidentally call itself or some otherclaudethat happens to be earlier on yourPATH. Runcommand -v claudeto check where yours lives, and change the path if it’s somewhere else."$@"passes on any arguments you give the wrapper, exactly as you typed them, soclaude-work --continueorclaude-personal -p "explain this"work just as they would withclaude.
You don’t need to create ~/.claude-work or ~/.claude-personal yourself, because Claude Code creates the directory the first time it starts with it.
Why not just use an alias?#
My first version was two lines in ~/.bashrc:
alias claude-work='CLAUDE_CONFIG_DIR=~/.claude-work claude'It worked fine in my own terminal, and nowhere else. Aliases are a feature of the interactive shell. They only exist in a shell that has read your .bashrc, and other programs can’t see them at all. Scripts, bash -c "…", VS Code tasks and anything that launches a process directly will all fail with “command not found”. A script in a directory on your PATH is a real command, so any program can find and run it. That matters in Step 4.
Step 2: Make sure ~/.local/bin is on your PATH#
When you type a command, the shell looks for it in each directory listed in PATH, in order. On Ubuntu, ~/.profile already adds ~/.local/bin if it exists. However, ~/.profile is only read by login shells, and it only adds the directory if it existed at the time you logged in. To be safe, add this to the end of ~/.bashrc as well:
export PATH="$HOME/.local/bin:$PATH"Putting it first means your own commands take priority over system ones with the same name. Open a new terminal (or run source ~/.bashrc) and check:
command -v claude-work claude-personalBoth should print a path inside ~/.local/bin.
Step 3: Log in once per account#
Now start each command once and log in with the matching account:
claude-work        # then run /login and sign in with your work account
claude-personal    # then run /login and sign in with your personal account
Each login is saved in that account’s own directory (on Linux, a .credentials.json file readable only by you), so you only do this once. Inside a session, /status shows which account and config directory you’re using. It’s worth checking the first few times until you trust it.
From now on you can have a work session open in one terminal and a personal one in another, and neither will ever see the other’s login, history or memory.
Step 4: Add the commands to VS Code’s terminal menu#
Typing claude-work is easy, but I want both accounts in VS Code’s + ▾ terminal dropdown so a session is one click away. VS Code calls these entries terminal profiles, and you define them in your user settings.json. Open it with Ctrl+Shift+P and choose Preferences: Open User Settings (JSON).
Here’s an example. Ubuntu is the default name for the WSL Ubuntu distro, but yours may differ, so run wsl -l -v in Windows to check and use that name in place of Ubuntu below:
"terminal.integrated.profiles.windows": {
    "Ubuntu (WSL)": {
        "path": "C:\\WINDOWS\\System32\\wsl.exe",
        "args": ["-d", "Ubuntu"],
        "icon": "terminal-ubuntu"
    },
    "Claude (work) (WSL)": {
        "path": "C:\\WINDOWS\\System32\\wsl.exe",
        "args": ["-d", "Ubuntu", "-e", "bash", "-lic", "claude-work"],
        "icon": "hubot"
    },
    "Claude (personal) (WSL)": {
        "path": "C:\\WINDOWS\\System32\\wsl.exe",
        "args": ["-d", "Ubuntu", "-e", "bash", "-lic", "claude-personal"],
        "icon": "hubot"
    }
},
"terminal.integrated.defaultProfile.windows": "Ubuntu (WSL)"
Save the file, and the two Claude entries appear in the dropdown next to the arrow beside + in the terminal panel. Here’s what happens when you pick one:
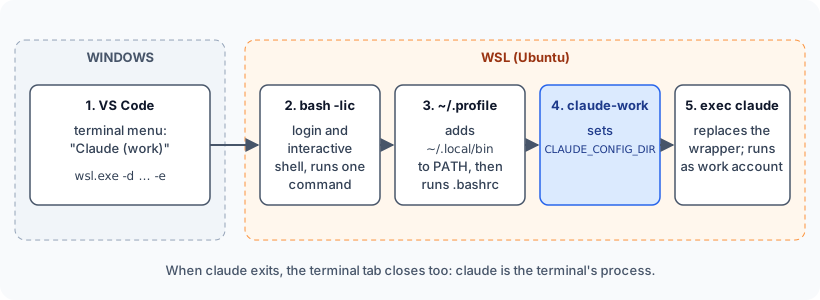
Each setting does the following:
terminal.integrated.profiles.windows: VS Code itself runs on Windows here, so the profiles go under the Windows key. The terminal startswsl.exe, and WSL takes over from there.-d Ubuntupicks the distro. It isn’t needed if you only have one, but it makes the profile explicit.-e bash -lic claude-work:-etells WSL to run this program directly rather than opening your default login shell. The program isbashwith three flags:-lmakes it a login shell, and this is the flag that’s easy to miss. A login shell reads~/.profile, which on Ubuntu adds~/.local/bintoPATH. Without it, bash depends entirely on your.bashrchaving thePATHline from Step 2, and if that’s missing, bash can’t findclaude-work.-imakes the shell interactive. Ubuntu’s default~/.bashrcstarts with a guard that returns immediately unless the shell is interactive, so-imakes sure the rest of your.bashrcruns too, including anyPATHchanges you’ve made there.-cruns the following string as a command, then exits.
iconsets the icon in the terminal tab. It takes any codicon name.hubotis a little robot head, which seemed appropriate.defaultProfilekeeps an ordinary shell as the default for +, so I only get Claude when I ask for it.
Because claude is the terminal’s process, the tab closes when you quit Claude. That’s what I want, but if you’d rather drop back to a shell afterwards, change the command to "claude-work; exec bash".
Using the Remote-WSL extension? If VS Code is connected into WSL (the green “WSL: Ubuntu” badge in the bottom-left corner), the terminal already runs inside Linux. Use the Linux profile key instead, and you can drop wsl.exe altogether:
"terminal.integrated.profiles.linux": {
    "Claude (work)": { "path": "bash", "args": ["-lic", "claude-work"], "icon": "hubot" }
}
Step 5 (optional): Give each account its own settings#
Each config directory has its own settings.json, so you can now tune each account separately. A work account may, for example, use a different - probably more expensive! - default model and your personal one perhaps has a more hands-off permission mode, or is set up for long, high-effort sessions:
~/.claude-work/settings.json:
{
  "model": "fable[1m]"
}~/.claude-personal/settings.json:
{
  "model": "opus",
  "permissions": { "defaultMode": "auto" },
  "effortLevel": "high"
}
The [1m] on the end of the work model is a qualifier that selects that model’s 1 million token context window. The context window is how much the model can hold in mind at once: your conversation, the files it has read and the results of the commands it has run. A bigger window means longer sessions on large codebases before Claude has to summarise and drop older context. The trade-off is cost, because long contexts use up a plan’s allowance faster, and the 1M versions aren’t available on every plan. Leave the suffix off (just "model": "fable") to get the standard window.
The same goes for plugins, skills and per-project memory under projects/. Each account builds up its own, and they never get mixed.
What is and isn’t separated#
It helps to be clear about where the line falls:
| Kept separate per account | Shared by both |
|---|---|
| Login and usage plan | Your project files |
settings.json | A repo’s CLAUDE.md and .claude/ folder |
| History, sessions, memory | The claude binary and its updates |
| Plugins and skills you install | Your shell, Git config and SSH keys |
Anything that lives in the repository is shared, which is usually what you want. It’s the project’s own instructions, so both accounts should follow them. Anything that lives in your home directory, outside the two config directories, is shared too. If you also need separate Git identities or SSH keys for work and personal repos, set those up separately (Git’s includeIf in ~/.gitconfig is a good place to start).
Finally, plain claude still uses the default ~/.claude, which is effectively a third, unnamed account. I simply stopped using it. If you want to be strict, you could point plain claude at one of the two accounts, but I find typing the account name every time is the best guard against using the wrong one.
Summary#
- Claude Code keeps all of its state in one directory, and
CLAUDE_CONFIG_DIRlets you choose which one. - Two one-line scripts in
~/.local/bin(claude-workandclaude-personal) each set that variable andexecthe real binary. ~/.local/bingoes on yourPATHin.bashrc.- Log in once with each command.
- Two VS Code terminal profiles run
wsl.exe -e bash -lic claude-work(orclaude-personal), so each account is one click away.
That’s about ten lines of configuration in total, there’s nothing new to install, and I haven’t picked up the wrong account once since setting it up.